Hardwood Installation Guidelines
Müller Graff engineered hardwood is aligned with NWFA (National Wood Flooring Association) standards. Read completely before beginning installation. The installer is responsible for all site conditions.
Pre-Installation Requirements
Jobsite Conditions
| Condition | Requirement |
|---|---|
| Building Enclosure | Windows and doors must be fully installed |
| HVAC Operational | Minimum 14 days prior to delivery |
| Wet Trades | Drywall, plaster, paint, and tile must be complete and dry |
| Indoor Temperature | 60°F – 80°F (15°C – 27°C) |
| Relative Humidity | 30% – 50% RH |
| Subfloor Flatness | 3/16" in 10' maximum variation |
Installer Responsibilities
- Carefully inspect ALL material prior to installation — do not install any defective or unwanted boards
- Natural color and grain variation is expected; blend from multiple cartons during layout
- Document jobsite conditions (RH, temp, moisture readings) before installation
- Leave 5–8% extra material for cuts and grading
- A manufacturing and grading defect allowance of up to 5% is industry standard
Acclimation
| Requirement | Specification |
|---|---|
| Duration | 3–5 days minimum (longer if RH >50%) |
| Method | Store flat in installation room with cartons open |
| Jobsite RH | 30–50% during acclimation |
| Temperature | 60°F – 80°F during acclimation |
- Open cartons and allow planks to breathe in the installation room
- Document temperature and RH before and during acclimation
- Blend planks from multiple cartons for natural appearance
- Acclimate in garages, outdoors, or unheated spaces
- Stack cartons closed — planks must breathe
- Begin installation before flooring has reached EMC
Moisture Testing & EMC
Equilibrium Moisture Content (EMC)
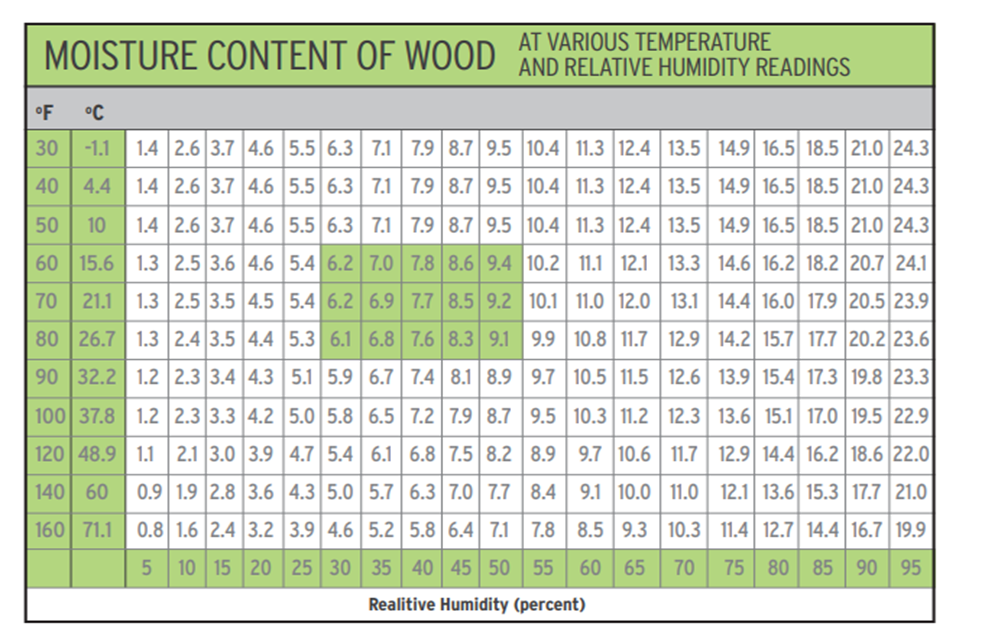
For engineered hardwood installation, EMC must be established by measuring jobsite temperature and relative humidity and referencing an EMC chart to determine the target moisture range; EMC is calculated by matching the ambient RH and temperature to standard EMC tables, which show the moisture content the wood will stabilize at. An acceptable EMC range for installation is typically 6–9% moisture content, which corresponds to normal interior conditions of about 30–50% relative humidity; installers must confirm the flooring has acclimated to this EMC range before installation and maintain those conditions long-term to minimize dimensional movement and prevent issues such as cupping, gapping, or delamination.
Interactive EMC Calculator
Adjust temperature & humidity to calculate expected wood EMC
Conditions are within the 6–9% installation target.
EMC Quick Reference at Standard Jobsite Conditions
| Temperature | 30% RH | 40% RH | 50% RH |
|---|---|---|---|
| 60°F | 5.6% | 7.2% | 8.6% |
| 70°F | 6.3% | 7.9% | 9.4% |
| 80°F | 6.9% | 8.5% | 10.1% |
NWFA Moisture Content of Wood — Temperature & RH Reference Chart
Use this chart to determine the expected EMC of wood at your jobsite's temperature and relative humidity.
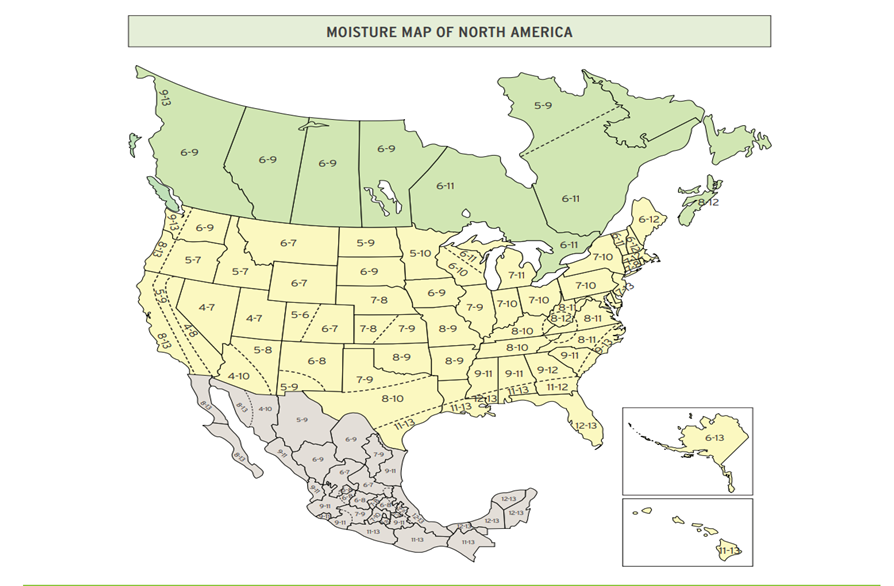
NWFA Moisture Map of North America
This map shows expected EMC ranges by region. Your region's range determines the target MC your flooring must reach during acclimation.
Moisture Testing Requirements
| Test Type | Maximum Acceptable Value |
|---|---|
| Wood Subfloor MC | ≤ 12% |
| Flooring vs Subfloor Differential | ≤ 3% MC difference |
| ASTM F2170 (In-situ RH probe) | ≤ 75% |
| ASTM F1869 (Calcium Chloride) | ≤ 3 lbs / 1000 sf / 24 hr |
| Tramex Concrete Meter | ≤ 4% upper scale |
Subfloor Requirements
| Subfloor Type | Min. Thickness | Flatness | Notes |
|---|---|---|---|
| Plywood | 5/8" CDX | 3/16" in 10' | Exposure 1 PS1-95 |
| OSB | 3/4" | 3/16" in 10' | Exposure 1 PS1-95 |
| Concrete | N/A | 3/16" in 10' | Fully cured — 60+ days minimum |
| Solid Wood | 3/4" x 5.5" | 3/16" in 10' | Group 1 dense softwoods |
- Use leveling compound with 3,000+ psi compressive strength
- Install new floor perpendicular to existing wood subfloor boards
- Use gypsum-based fillers in high moisture areas
Moisture Barrier & Vapor Retarders
Wood Subfloors
Use vapor retarder with perm rating 0.7–50 (e.g., asphalt-saturated kraft paper, silicon vapor shield).
Concrete Subfloors
Use moisture barrier with perm rating < 0.13 (e.g., Titebond® 531+ or equivalent moisture-cured urethane adhesive with built-in barrier).
Installation Methods
| Method | Substrate | Notes |
|---|---|---|
| Glue-Down | Wood, Concrete | Urethane/silane adhesive; roll at 100 lbs post-install |
| Floating | Any flat subfloor | Use underlayment + vapor retarder; 1/2" expansion gap |
| Nail-Down | Wood subfloors only | 18–20 gauge cleats/staples; glue-assist on widths ≥ 5" |
Installation Process Overview
Step-by-step visual guide for nail-down engineered hardwood installation
Prepare Subfloor
Clean, flat, dry. Max 3/16" variation in 10 ft.
Check Moisture
Measure subfloor and flooring moisture content. Confirm acceptable levels per manufacturer and jobsite conditions.
Acclimate Flooring
Acclimate flooring per manufacturer guidelines. Maintain 60–80°F and 30–50% RH.
Lay Reference Line
Snap chalk line parallel to longest wall, square to room.
Install First Rows
Face-nail first 2–3 rows. Tongue faces out into room.
Blind Nail / Glue
Blind-nail at 45° through tongue every 8–10".
Maintain Expansion
Keep ½–¾" gap at all walls, pipes, and fixed objects.
Install Moldings
Add T-moldings at transitions. Install baseboards last.
Cross-Section: Nail-Down Assembly
Yellow zones = required expansion gap at walls. Blind-nail at 45° through tongue every 8–10".
Layout & Racking Guidelines (All Methods)
- Remove all doors, baseboards, and shoe mouldings before installing
- Plan layout to avoid planks narrower than 2" in the final row
- Stagger end joints a minimum of 2x the plank width
- Always blend from multiple cartons for color and grain consistency
- Create H-patterns, stair-steps, or aligned end joints
Nail-Down Installation Details
- Use 18–20 gauge cleats or staples (1½"–2") approved for engineered wood
- Nail every 4"–6" along plank, 1"–2" from ends
- Glue-assist required on planks 5" wide or wider
- Face-nail the first and last rows where necessary; fill nail holes
- Install nail-down over concrete or radiant heat unless plywood subfloor is first installed
Glue-Down Installation Details
- Use urethane or silane-modified adhesive only
- Trowel adhesive per manufacturer specs — cover only what can be installed within 30 minutes
- Set planks into adhesive and roll floor with 100 lb roller
- Maintain ½" expansion space around entire perimeter
- Clean adhesive residue immediately
- Wait 8–24 hours for foot traffic depending on adhesive cure time
- Use tapping blocks — avoid striking planks directly with mallet
- Allow 6" stagger between end joints; avoid pattern repetition
Floating Floor Details
- Install over approved underlayment with vapor retarder
- Glue joints with approved PVA glue (tongue and groove); strap rows and allow cure before traffic
- Clean excess glue immediately
- Cut door casings 1/16" higher than flooring + underlayment thickness
- Provide expansion space around all fixed objects (fireplaces, stair stringers, stonework, outlets)
- Anchor T-mouldings or transitions to the floating floor — anchor to subfloor only
- Install floating floors beneath fixed cabinetry or islands
- Place furniture or appliances over 600 lbs without providing additional expansion space
Locking Mechanism Types
| System Type | Installation Technique |
|---|---|
| Angle / Angle | Tilt and lock both long sides and ends simultaneously |
| Angle / Hook | Long side angles in; end hooks secure as next row installs |
| Angle / Fold Down | Single-action lock (often with audible click) |
Peel-and-Stick Underlayments
- Peel film only as wide as the next plank being installed
- Press plank firmly into exposed adhesive and continue row by row
Starter Row
- Align first row with precision (max deviation 3/16" over 10')
- Start the next row with the cut-off from prior row (minimum 12" length)
Herringbone Installation Guidelines
Based on NWFA Standards for Engineered Wood Flooring — Glue-Down Patterned Layouts. Herringbone is a precision pattern that magnifies even small errors. Proper layout is critical.
Jobsite Conditions (Herringbone-Specific)
| Condition | Requirement |
|---|---|
| HVAC Operational | Minimum 7 days before delivery |
| Temperature / RH | 60°F–80°F / 30%–50% RH before, during, and after |
| Subfloor Flatness | 3/16" in 10' or 1/8" in 6' — use self-leveling compound |
| Subfloor MC | ≤ 12% |
| Flooring MC Differential | Within 2–3% MC of subfloor |
| Concrete Cure | Minimum 60 days; ASTM F2170 ≤ 75%, ASTM F1869 ≤ 3 lbs, Tramex ≤ 4% |
Layout Planning
- Identify the primary visual wall or space center and snap a centerline
- Snap a perpendicular layout line using a 3-4-5 method; confirm 90° angles with laser or framing square
- Create a rigid starter block (plywood jig or cleated board) to maintain pattern alignment
- Dry-lay a full section of herringbone to verify pattern fit, squareness, and room impact
- Choose orientation: 'V-point toward main entry' or 'diagonal' based on design intent
Adhesive & Tools Required
| Item | Specification |
|---|---|
| Adhesive | Moisture-cured urethane (e.g., Bona R851, Sika T-55, Bostik GreenForce) |
| Trowel Size | Per adhesive specs — typically 3/16" x ¼" V-notch |
| Roller | 100 lb. roller required |
| Tape | Painter's tape only — not duct or masking tape |
Step-by-Step Herringbone Installation
Establish First Row
Begin at centerline using a starter block to hold first 'V' pair. Confirm first few rows are square to layout lines.
Apply Adhesive
Spread only what you can install in 30 minutes. Press each plank firmly into the adhesive.
Install in Sections
Continue pattern row by row, keeping tight joints. Use painter's tape to hold rows in alignment while adhesive sets.
Use Splines as Needed
When changing direction or when groove-to-groove boards meet, use splines (slip tongues) with adhesive.
Roll Floor
Use a 100 lb. roller every 2–3 rows and once again after full installation.
Expansion Gaps
Maintain ½" expansion space at all vertical surfaces.
Cure Time
Avoid foot traffic for 12–24 hours, or per adhesive manufacturer's specification.
Key Considerations
- Confirm board squareness — pre-milled herringbone boards must be precise before installation
- Dry-lay boards from multiple cartons to blend color and grain pattern
- Recheck alignment every 3–5 rows to prevent visual drift across the field
- For fireplaces or built-ins, use a temporary perimeter board to finish cleanly against edges
Radiant Heat
| Condition | Requirement |
|---|---|
| Max Surface Temperature | 82°F (28°C) — never exceed (85°F for herringbone glue-down) |
| Heat-Up Protocol | Gradual — increase 5°F per day after installation |
| Cool-Down Protocol | Gradual — decrease 5°F per day |
| Moisture Test Required | Yes — documented before installation |
| Acclimation Adjustment | Reduce radiant to 65°F during acclimation period |
Expansion Rules
| Location | Requirement |
|---|---|
| All Walls | ½"–¾" expansion gap on all sides |
| Fixed Objects | ½" gap around pipes, columns, door frames, fireplaces |
| Large Rooms (> 40 ft) | Expansion joint required |
| Doorways / Transitions | T-moulding at every room change — anchored to subfloor only |
Crawlspaces & Basements
| Requirement | Specification |
|---|---|
| Vapor Barrier | 6-mil poly — 100% coverage of crawlspace floor |
| Clearance to Joists | 18" minimum |
| Perimeter Venting | 1.5% of crawlspace area for cross ventilation |
Installer Responsibilities & Final Checks
- Inspect ALL material prior to installation — do not install defective boards
- Document jobsite conditions (RH, temp, moisture readings) before beginning
- Leave 5–8% extra material for cuts and waste
- Protect floor during construction — cover with breathable material (perm rating ≥ 1)
- Remove adhesive residue immediately after installation
- Allow 24 hours before moving furniture back in
- Clean floor, install all trim and transition mouldings
- Leave touch-up kit and spare material with the owner
- Install in bathrooms, saunas, or areas with floor drains
- Install when RH is outside 30–50% range
- Skip moisture testing on any subfloor type
- Install defective boards — installation constitutes acceptance of material
- Allow standing water during or after installation
NWFA Jobsite Checklist Summary
| Checklist Item | Requirement |
|---|---|
| HVAC operational | Yes — 14+ days pre-installation |
| Temperature / RH maintained | 60°–80°F / 30–50% RH |
| Subfloor flatness verified | Max 3/16" in 10' |
| Moisture testing documented | Flooring and subfloor MC measured and recorded |
| Crawlspace sealed and ventilated | Yes |
| Vapor barrier in place | Yes — wood and concrete subfloors |
| Material inspected before install | Yes — defective boards removed |
| Expansion gaps maintained | ½"–¾" at all perimeter and fixed objects |
Reference: Müller Graff Hardwood Installation Guidelines | NWFA Standards. Proper installation directly supports your warranty. Maintain 60–80°F / 30–50% RH year-round to minimize seasonal movement.